We shared an excellent easy to use, plug-n-play chat system Chatwing for websites and blogs earlier, here is yet another post showing in details how to customize and use the embeddable chat system on your websites.
A chatroom that is very easy to use and manage can provide a site more opportunities to draw in more traffic. And with Chatwing chat software, it’s pretty easy to get that kind of chatting tool. It’s because Chatwing has excellent chatting capabilities coupled with a lot of features that compliments it, making it the last chatting tool you’re going to need.
Listed below is a step by step procedure as to how you can embed this pretty efficient chatroom on your site. Follow it from the beginning to the end, and you’ll have a brand new chatroom in no time!
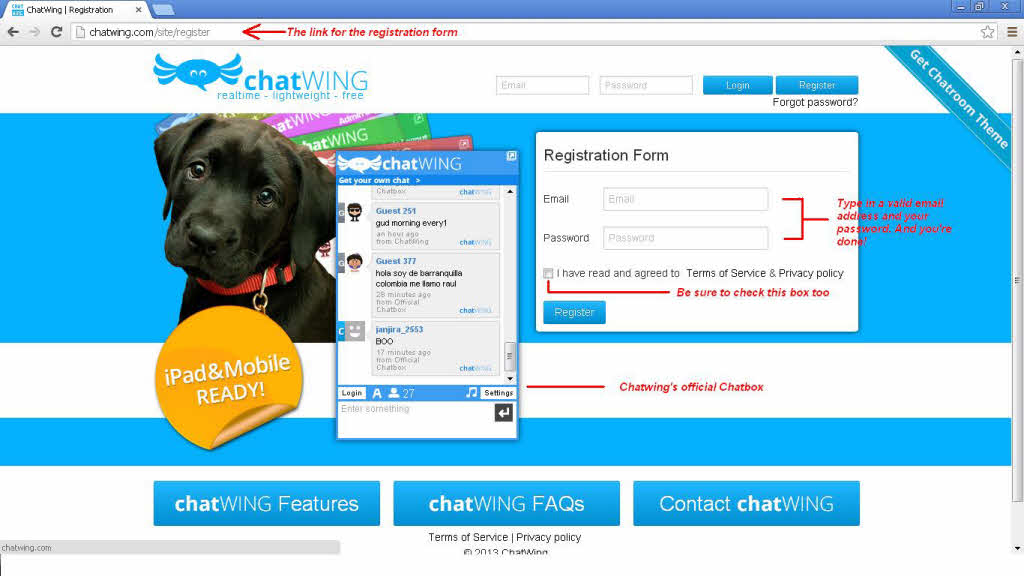
Step 1: Get a Chatwing Account
First, go to Chatwing’s homepage and open the registration form. You’ll need to fill it up with a valid email address and your desired password, along with checking the boxes below it. Submit it when you’re done to head on to the next page.
Step 2: Create the Chatroom
Next up is the Dashboard page. You can create your chatrooms here and manage the existing ones you already have. To create a new chatroom, press the Create chatbox button. To manage an already existing chatroom, look it up on the chatroom list and press one of the three corresponding buttons on the opposite side of the chatroom’s name – the three buttons are View, Customize and Use.
For now, let’s go with the Create chatbox button. It will redirect you to the next page once you press it.

Step 3: Customize the Chatroom
Your chatroom won’t be complete without going through the customization page. In this page will get to utilize most of Chatwing’s features and thoroughly change its appearance, increasing its efficiency greatly. This process has been made easier when it was categorized into different tabs – with each one changing a certain part of the chatroom. All you need to do is browse through these tabs, one by one and change its settings until the chatroom suits your preferences.
You can see the changes you’ve currently made on the preview window on the right side of the page. There are also different modes in customizing – Basic and Advance. Technically, since it’s your first time customizing, the customization options has been set to Basic by default. To switch to Advance mode, press the Switch button found on top of the Customization page – press it again to revert to Basic mode.
Note: Always save your changes via the Save buttons place on each tab. If you don’t do it before going to the next tab, the settings will revert back to the previous one.
After customizing, press the Use button – you can also find it on top of the page.

Step 4: Embedding Page
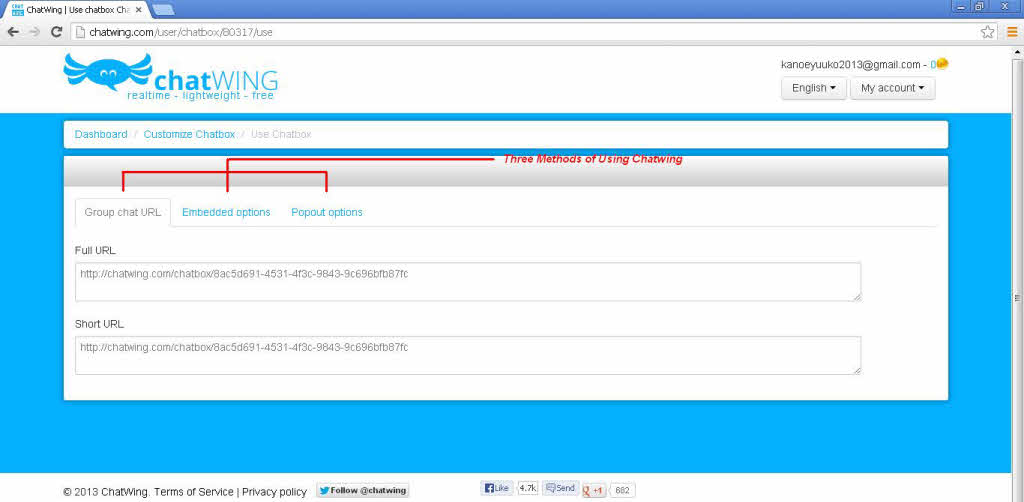
We’re finally here, in the Embedding Page. As the name implies, you’re on the final step to embedding your chatroom on your site. But before that, you need to choose from the three tabs found on this page – Group Chat URL, Embedded Options and Popout Options. Your best choice would be Embedded Options, so pick that.
Inside this tab, you can see two scrollbars used to change the size of your chatroom – you can see its actual size on another preview window (same one on the customization page). Remember that the size you’re seeing is going to be the size of your chatroom for your site. Change it using the bars if you want, until you fit it into the best convenient size for you.
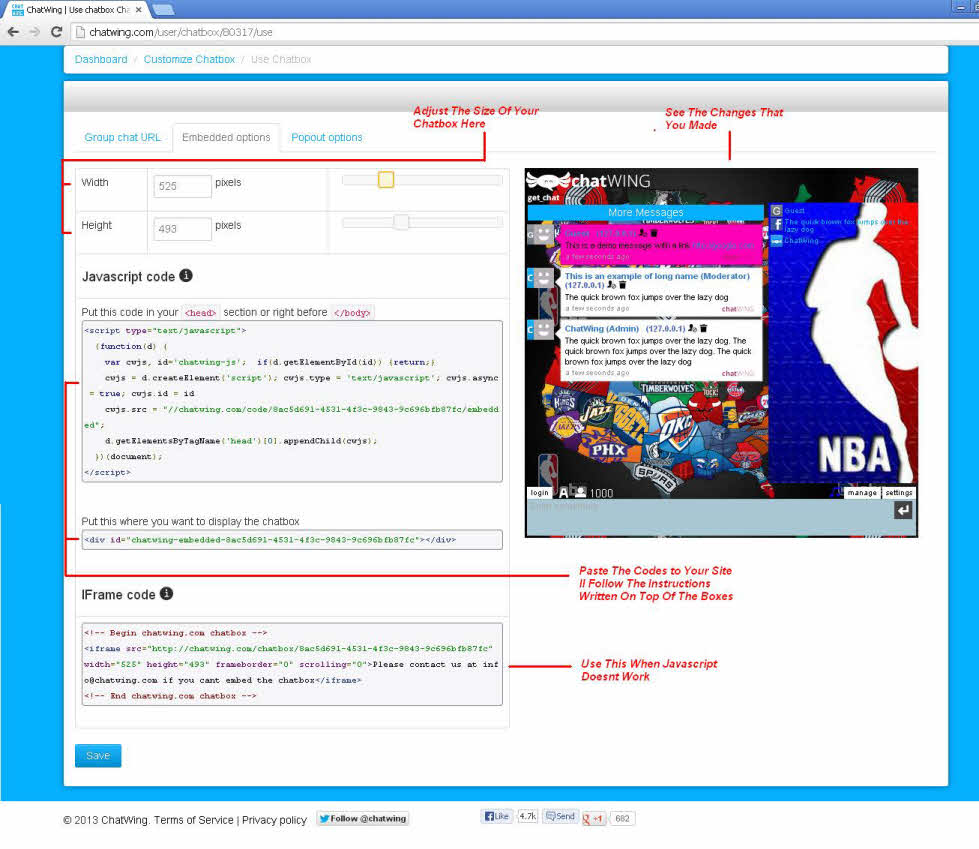
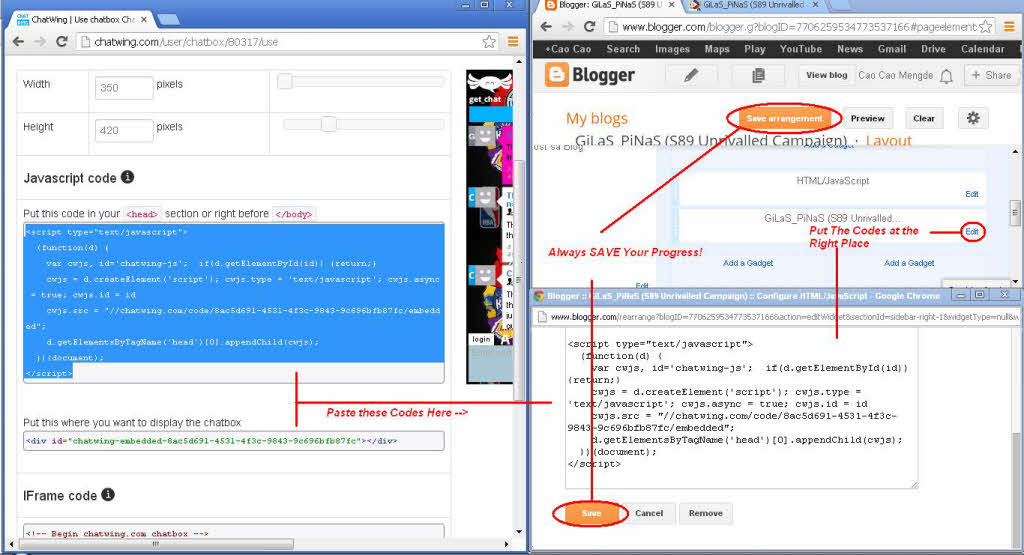
After that, look for the Javascript codes below. Open your site and find the perfect place to embed your chatroom and paste the codes there. There are additional instructions in the Embedded Options tab that will help you get it right. After that, save the changes you’ve made on your site and open it again – the chatroom should be where you wanted it to be.
Note: Some sites don’t execute Javascript. To solve this minor setback, just replace the Javascript codes with the iFrame codes. It’s found in the bottom of the Embedded Options tab.
Using the Chatroom
Your viewers will find the chatroom very easy to access and use. That’s because they can use their social media accounts to join inside instead of creating a separate chatting account. Chatwing has Facebook, Twitter, Google, Yahoo, Tumblr and Instagram login methods in store for them.
As the administrator, you can easily control the conversations being held inside the chatroom. If you find any person who are spamming inside, you can easily kick them and delete their messages. You can also assign moderators to help you manage it and make your job much easier. That way, the chatroom is well protected and your chatters will regard it as a place to get credible information about the site from you.
Chatwing is always being improved, even now. So always keep your chatroom updated so you can always use it at its best.
Comments
i like new things.
i like new things.
Add new comment